I had a tough time looking for an enclosure to modify to suit my needs. My Creality CR-10S printer requires an approximately 28″ x 24″ x 20″ space to do its printing, which is larger than most standard cabinets. Because fire safety was a priority, I ruled out any DIY enclosures that used plywood or other flammable materials. The “holy grail” would have been an all-metal enclosure, but whatever solution I found would need to be carried up the stairs to my apartment, and that made bulky steel toolboxes less attractive. Eventually, I discovered 19-inch server racks, which seemed to have the right depth without being excessively wide. Armed with new search terms, I turned to Craigslist.
I purchased the equipment case for $60 from a gentleman who bought a pallet of various travel cases at a Boeing surplus auction. The case was dusty and empty when I received it, but it did have a label indicating that it had been used for test equipment.
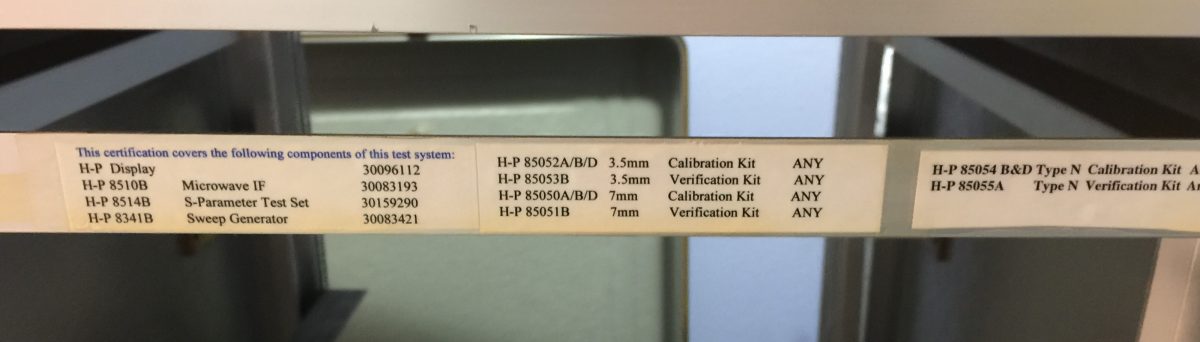
A peek at the enclosure's former life, this label was on the inner frame of the case.
The case is sturdy, but fairly lightweight. The shell is fiberglass, with aluminum reinforcement. While fiberglass is not fireproof, the resin in the fiberglass doesn’t catch fire easily. It should be much more fire resistant than plywood or MDF. The case has two full length doors that can be completely removed to access both sides of the equipment. Each door has an airtight seal around the perimeter, and the doors clamp shut with latches. The door seals would have created potential pressure imbalances if the case was opened in a low pressure environment (on a test flight, for example), so the case has a neat pressure relief valve.
Battle-scarred pressure relief button
To make my printer fit in the case, I needed to divide the upper and lower sections of the case. On the upper level, the printer needed to have the entire breadth of the case to fit inside, meaning the internal frame needed to be removed. For printing exotic materials (or even ABS), the printer area needs to be kept very warm. However, the electronics in the control box must stay cool at all times, so I needed a way to isolate the upper and lower levels. In addition, the shelf that the printer sits on needs to be genuinely fireproof, as it would be the first to receive dripping plastic in the event of a fire.
To satisfy these requirements, I used fiber cement backer-board that I cut into shape to seal the edges of the enclosure. Because the doors of the enclosure have about 3″ of depth, I extended floor sections into the doors. I used 1/4″ aluminum trim channel (Lowes) and rubber weatherstripping to create a seal between the doors and the printer shelf. HardieBacker is difficult to work with, but it’s cheap and reasonably lightweight. I cut it down to size with determination and a utility knife.
Cement board printer shelf after installation
Printer shelf with door extension and seal
The back of the enclosure houses the power distribution and various electronics that control the printer. I looked around for a while in an effort to find a non-flammable solution to mounting the electronics to the case. I ruled out plywood, and I didn’t want to spend the money for a custom sheet metal plate if I could avoid it. Ultimately, I found a 16″ x 16″ steel pegboard panel at Lowe’s, which worked very nicely. The hole pattern added flexibility and allowed me to “cheat” with cable ties to lay out my components. I designed and printed 4 brackets to fit into the enclosure’s inner frame and hold the pegboard in place. I also printed small cable management clips to match the pegboard’s hole pattern (Thingiverse link).
Electronics panel with 3D printed brackets
3D-printed cable retention clips
While printing unattended, I attach both doors of the enclosure, closing both top and bottom enclosures. To check on the print remotely, I use the webcam stream through Octoprint. While I’m nearby, I usually leave the front enclosure door off so I can monitor the print in person. Printing doorless works fine for PLA, but once I start printing ABS or nylon, I may add a hinged/transparent door to allow quick access without losing the heat in the printer area.
Printer in it's home - the laundry room
Printer moved for attic access
The wheels on the enclosure have been essential. The spot in my apartment’s laundry room where my printer lives is shared by the access ladder for the attic space. The printer easily rolls out of the way to allow attic access, without needing to unplug power or disconnect the vent duct.